Bringing VHS to the Future!
A few months back I converted my desktop into a home media server using UnRAID. The details for that deserve its own post, but suffice to say that one reason for going this route is to take back control of my data. Instead of relying on Google Photos to serve as a backup location for my family’s photos and movies, they would be stored locally on my server and accessible via Plex. On top of that, I utilize Nextcloud to automatically back up photos and movies from my phone and my wife’s phone (which is smart about separating movies and photos and also adds a year/month file structure).
Great! But what happens if my server dies or, even worse, something happens to our house? For this I rely on Duplicati which creates encrypted backups that are stored on an Amazon Cloud instance. I create nightly backups and retain the last month’s worth in case I screw something up (ie. deleting a bunch of folders by accident which totally didn’t happen…twice).
So I have a way to store all my digital media locally, as well as create backups so I can retain the data in case of a disaster. What about media that is not digital? What about all of those home videos from years past stored on… magnetic tape?
Table of Contents
Transferring VHS to a Computer
Yes, I’m talking about VHS. My parents took loads of video on the ol’ shoulder-mount and for two decades they have collected dust on a shelf in their basement. So I took it upon myself to take those VHS tapes and get them onto my server to save those memories… forever.
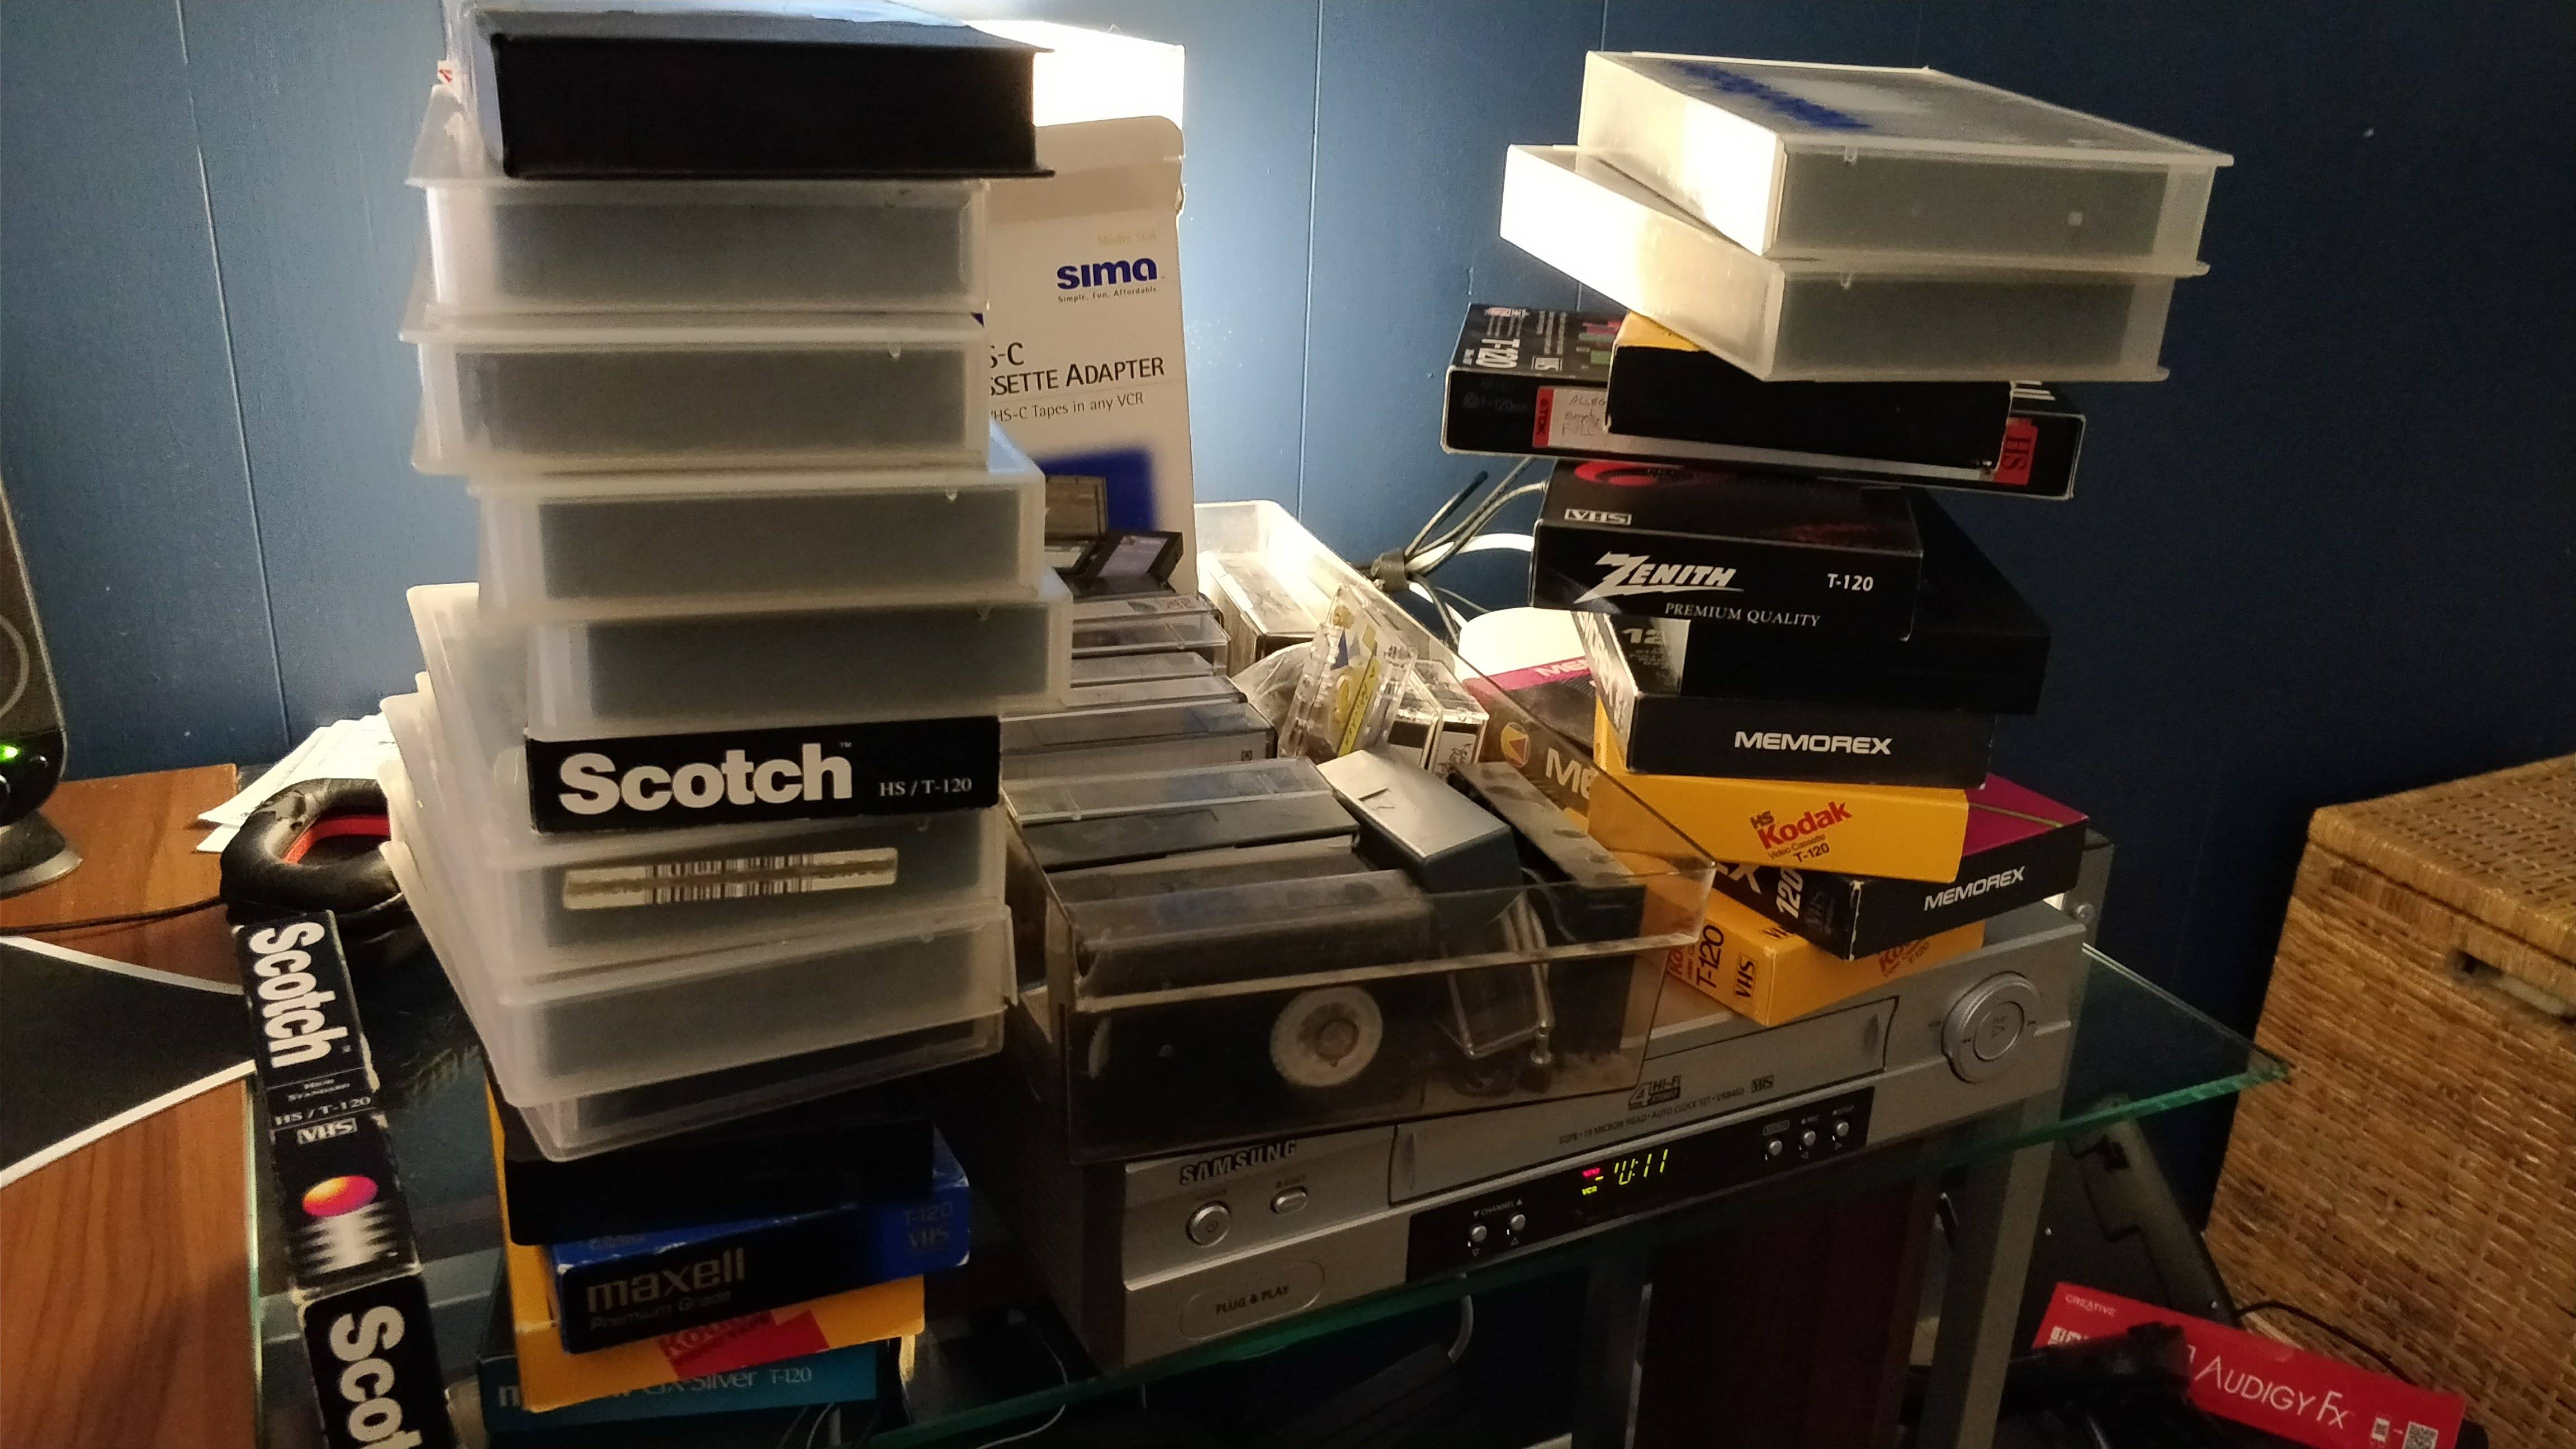
Given that it’s the year 2017, finding a working VCR was… difficult. I finally had some success on eBay where I was able to purchase a working unit for $40. Totally worth it in the end. The other thing I needed to purchase was a composite-to-usb adapter. There are many out there, the one I bought was around $20 and came with some really crappy software that I opted not to use.
Capturing the video
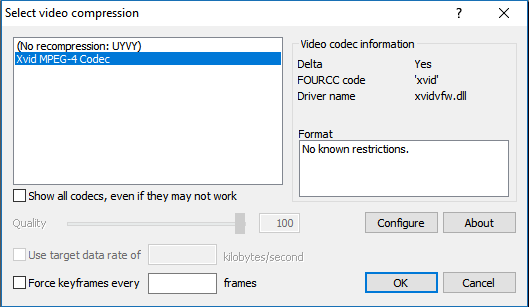
Once I had the equipment, I needed to actually capture the video. To do this, I fired up my Windows 10 virtual machine (again, running on UnRaid) and I used an awesome (and free) piece of software called VirtualDub. After selecting Capture AVI in the menu and ensuring the correct capture device was selected, I began to capture the video.
But wait.
Every 30 seconds or so was around 1GB… that can’t be right. Well, out of the box, virtualdub does not compress the video. For that you need to install a codec to do the compression. In my case, the Xvid codec worked great. I just had to navigate to the Video menu in VirtualDub and go to the Compression settings to select the codec. One additional step I took was to set a stop time of 2.5 hours so I could start capturing a video at night and wake up the next morning without an 8-hour long clip with a black screen for 75% of it.
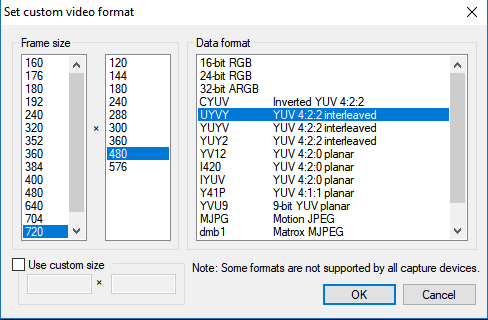
As the above setting show, I performed no additional compression tweaks nor any resolution changes. My server had about 3TB of free storage, so I figured that wouldn’t be a problem. I’ll explain why I was wrong later…
Ok, now we’re good to go.
Audio Sync Issues
The first issue I encountered was some audio syncing issues. Luckily, this can be easily fixed inside of VirtualDub. After exiting the Capture mode (via the File menu), you can start editing the video. My issue was purely a case of the audio playing some time before the associated point in the video. This is a very easy fix, but required a bit of trial-and-error.
Eventually, that trial-and-error turned into a tedious task. Each video would have a different skew and, occasionally, the audio would experience an integral skew (not sure if that’s the appropriate term) where the skew would accumulate over time.
Ugh.
So, I needed to fix this. I ended up tweaking some timing settings, as shown below. This seemed to have given me more consistent audio skew (usually 1.8s, actually) and completely got rid of the so-called “integral skew” which was a huge win. I think the major lever there was the Insert null frames when captured frames are too far apart setting, but I honestly was just throwing stuff at the wall to see what would stick at that point, so I could be wrong.

Splitting Video Files
At this point, I had an AVI file that I pulled from a VHS tape and fixed any audio sync issues. Awesome! The problem is, I don’t want a single 2hr video, I want to separate it into clips.
At first, I started manually separating clips which was, in a word, painful. After realizing the amount of time it was going to take me, I started a google search for tools that will do this automatically can came across PySceneDetect which is AMAZING.
After installing the windows command-line version using their installation tool (v0.4, specifically), I had to decide how I wanted to split my videos. PySceneDetect offers two modes:
- Content-aware (Intelligent scene detection, but slow)
- Thresholding (Basically looks for ‘black’ screens in between cuts)
I opted for thresholding since it was faster and less aggressive than content mode. To use this, I opened a command prompt (Windows Key + R, type cmd.exe, hit Enter) and then used the cd command to navigate to where I stored my videos. From here, assuming I had a video file called home-movie.avi, I ran the following command:
scenedetect -i home-movie.avi -d threshold -t 12 -o split-home-movie.avi -df 2
-iindicates the input file-oindicates the output file-dsets the mode (eithercontentorthreshold). Basically, whether to split a scene based on some threshold (i.e. black frames in between) or based on a slower content-aware image-processing algorithm. I opted for speed.-tsets the threshold for either mode-dfsets the downsampling factor (i.e. with-df 2, an 800x600 image would be downsampled to 400x300 to speed up processing)
It took maybe around 10 minutes per video and, when it was complete, I verified that each clip was correct. Occasionally, the settings I used with PySceneDetect would end up being too conservative and I’d end up with a clip containing multiple scenes. To fix that, I reverted to manually splicing using AVIDemux.
Using AVIDemux to Split Scenes
For my early (i.e. old) VHS tapes, there almost always was a black frame between adjacent scenes. So my settings for PySceneDetect worked super well. In fact, they worked so well that I decided to just run a batch script on Windows to split all my videos and move the original file to my UnRAID array for safe keeping. Unfortunately, I ran this script before fixing the audio de-sync issues, so I’d have to go in and manually de-skew each scene, rather than a whole video. This doesn’t take a whole lot of work, so I wasn’t too worried about it.
However…
When I started verifying my newer VHS tapes (they tended to be the VHS-C tapes) I noticed fewer scenes produced by PySceneDetect. It turns out, black frames were not inserted between scenes, so the python tool was having difficulties splitting scenes. I had to manually split these files.
Luckily, AVIDemux makes this pretty easy. The only thing I really had to do (outside of switching to the AVI container from the default MKV) was to change the audio codec from copy to mp3. After saving a video with copy the audio was all garbled. I changed it to mp3 as an experiment and it worked, so I kept it.

Transferring Files
After spending a decent amount of time splitting video/fixing audio sync/renaming files, it was time to create some Christmas presents for my family. As I was moving these tapes over to my server, it occurred to me that putting them on a USB stick to give to my parents and siblings as a Christmas present would be a pretty cool thing to do. I ended up buying three 32GB USB sticks for this. No way I had more than 32GB of VHS tapes, right?
Well, remember when I didn’t optimize anything once I added the Xvid codec? As it turns out, once I tallied up all the videos I had 49 GB… well… shit.
So now I had to compress all my videos before transferring them to the USB sticks. How could I do that?
Compressing with ffmpeg
Enter ffmpeg. I figured out I could fire up my Debian VM and use ffmpeg to compress all my videos. In fact, I could script this and walk away, I just had to figure out an approach that would work.
The first step was to figure out what type of settings would be appropriate with ffmpeg. I settled on the following command, and will describe (to the best of my ability) what each flag is doing.
ffmpeg -i original.avi -c:v libx264 -crf 26 -preset faster new.avi
c:v libx264sets the encoder to x264, which seems to be a pretty popular choice-crf 26sets the constant rate factor to tell the x264 encoder what type of quality it should use. The higher the number, the lower the quality (the more aggressive the compression). I think23is regarded as DVD-quality, so I experimented and found26to work well with zero noticeable video degradation. I was probably overly conservative here.-preset fastertellsffmpegwhat encoding speed to use. The slowest isveryslowand the fastest isultrafast. The faster it is, the lower the quality.
I found ultrafast to, indeed, by very quick but the quality definitely suffered. Through some experimentation, the faster preset in combination with -crf 26 to give me the best results, with an average compression ratio of about 3.8x. So my 49GB would turn into around 13GB. Perfect.
Moving files to USB
Now I had to compress my files and move them to the USB stick. To do this, I decided on the following steps:
- Copy a full year of videos over to a temporary directory on the USB stick
- Compress the videos to the final location on the USB stick
- Remove the temporary directory
- Repeat
It may not be the most elegant solution, but it worked (although it was quite slow, as I’ll show in a minute). Another wrinkle was that I had also been migrating my wife’s VHS tapes to my server, so many of the years I wanted to transfer to the USB stick also included some of my wife’s videos that I did not want to transfer. To solve this, I ended up using the --exclude-from flag for rsync. This allowed me to create a file called EXCLUDES that contained directories and files I wanted to exclude from the copy. Luckily I had already been adding my wife’s name to any of her videos, so this was very easy to accomplish. An example entry is below.
2017
2016
*/*_wife*.avi
So now I could create my script. I added a .scripts directory to the USB stick and added my EXCLUDES file, as well as the following script, to it. I also had to make sure my UnRAID shares folders were mounted inside my Debian VM. I added a /mnt/shares directory for this purpose. I used the following command to mount my share (I passed /mnt/user to /unraid_shares in my VM settings prior to initializing my VM).
sudo mount -t 9p -o trans=virtio /unraid_shares /mnt/shares
I then ran this script from the .scripts directory on the USB stick and walked away.
#!/bin/bash
#
# Author: Kevin Fronczak (2017/12/22)
#
# This script performs an rsync on each specified directory
# After rsync, it compresses each video file to a new directory
# and then the old one deleted
#
# NOTE: this must be run from linux VM, not unraid

vid_dir=/mnt/shares/homevideos
photos=/mnt/shares/photos
src_list="1988 1990 1991 1992 1993 1994 1995 1996 1997 1998 1999 2000 2001 2005"
temp_dir=../.tmp
base_dir=../homevideos
photo_dest=../photos

# Setup file structure for USB stick
mkdir $temp_dir
mkdir $base_dir
mkdir $photo_dest

for dir in $src_list; do
    echo "Working on $dir..."
    rsync -av --progress --no-o --no-p --no-g --modify-window 1 --exclude-from=EXCLUDES $vid_dir/$dir $temp_dir
    echo "Beginning compression of $dir..."
    mkdir $base_dir/$dir
    for i in $temp_dir/$dir/*.avi; do
        filename=$(basename "$i")
        ffmpeg -i $i -c:v libx264 -crf 26 -preset faster $base_dir/$dir/$filename;
    done
    echo "Cleaning up $dir..."
    rm -rf $temp_dir/$dir
done
rm -rf $temp_dir
rsync -av --progress --no-o --no-p --no-g --modify-window 1 --exclude-from=EXCLUDES $photos $photo_dest
echo "Complete!"
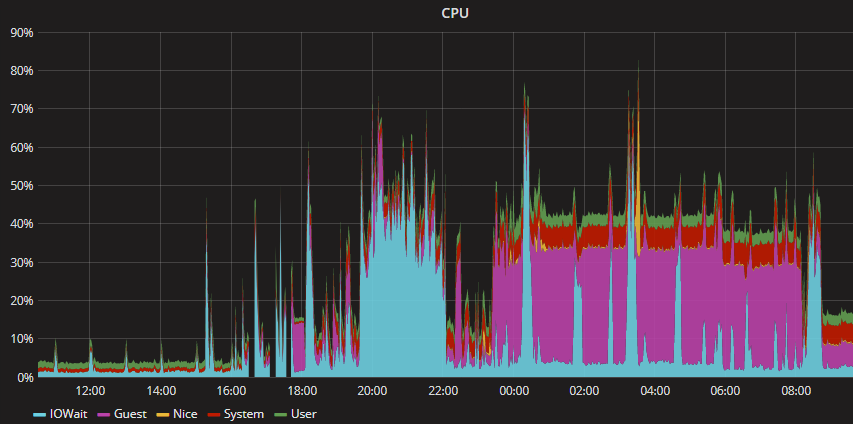
One thing I was interested in (after already kicking the script off) was how long this would take. Luckily, I monitor CPU activity and store it in an InfluxDB database which I then plot with Grafana. Based on the following plot, it took about 8.5 hours to move and compress 49 GB of video with my settings, which is around a datarate of 1.6 MB/s. That seems slow, but maybe it’s not given the fact that I’m compressing all those videos.
Bonus points if you can tell when I turned on my VMs… shouldn’t be hard to figure out.
The very final step was to copy the contents of the first USB stick to subsequent USB sticks. I just used the rsync command in my script with the source as my first USB stick and the destination as my next USB stick. That was much faster to transfer than transfer+compression, obviously.
Finally Finished
It was a relief to finally be finished, given I finished only two days before Christmas. Now I get to do it all over again for my wife’s remaining tapes, but at least I have the kinks out (and I’m not on a deadline)!