Home Automation with Home Assistant
Ever since my wife and I purchased our first home in 2014, I’ve been obsessed with home automation. I started with a few GE Link lightbulbs connected to a Wink Hub and pre-ordered an Amazon Echo with the hunch that they would eventually add in functionality to control my Wink Hub vias voice (they did!). But I wasn’t satisfied. I could control my lights remotely and with my voice, I could even set up basic automation routines with Wink… but it was slow. Each action had to be communicated to Wink’s servers and then back to my lights. On top of that, I was at the mercy of both my internet as well as Wink’s servers: I had at least one run-in where my house was no longer automated because of a server problem on Wink’s end.
This was no bueno.
So I started searching for alternatives. My primary goals were the following:
- Local control (no external server communication)
- Some sort of presence detection for automations
- Low entry cost
Eventually, I found that solution in Home Assistant. Before I dive into everything, I should mention that I keep my home assistant configuration up-to-date on my github page if you’re interested in checking it out.
Table of Contents
- Starting with Home Assistant
- Current Setup
- Lights with Phillips Hue
- Media
- Climate Control
- Device Tracking
- Other Components
- Final Words
Starting with Home Assistant
My first working configuration for home assistant was in July of 2016 with version 0.24. Here I still had all of my lights routed through Wink, so I had not yet gotten to local control, but my automations were set up. I installed Home Assistant on a Raspberry Pi 3 and had it hard-wired to my router. Given that I already owned one, the entry cost for this setup was $0.00, not including the time I had to set it up. Regardless, this met my “Low entry cost” criteria.
One of the first things I included was nmap-based presence detection to check if either my wife or myself were home and turned lights on/off based on that. Given that my old configurations are…well…old, I’m not going to post the raw yaml here since it likely does not apply to current versions of Home Assistant. Instead, I’ll show you my pseudo-code. Below is an early automation example for turning my lights off when we leave for work:
if group.all_devices is 'not_home':
    if time between '7:30:00' and '10:00:00' and day is not weekend:
        service.turn_off_all_lights()
Pretty straight-forward and easy to implement (not so easy with Wink at the time). So this met my second criteria of “Presence-based automation”. Great! Now only thing I’m missing is local control, which Home Assistant will allow me, provided I have the correct equipment.
Current Setup
Before diving into how I amassed my setup, I’ll show you the big picture.
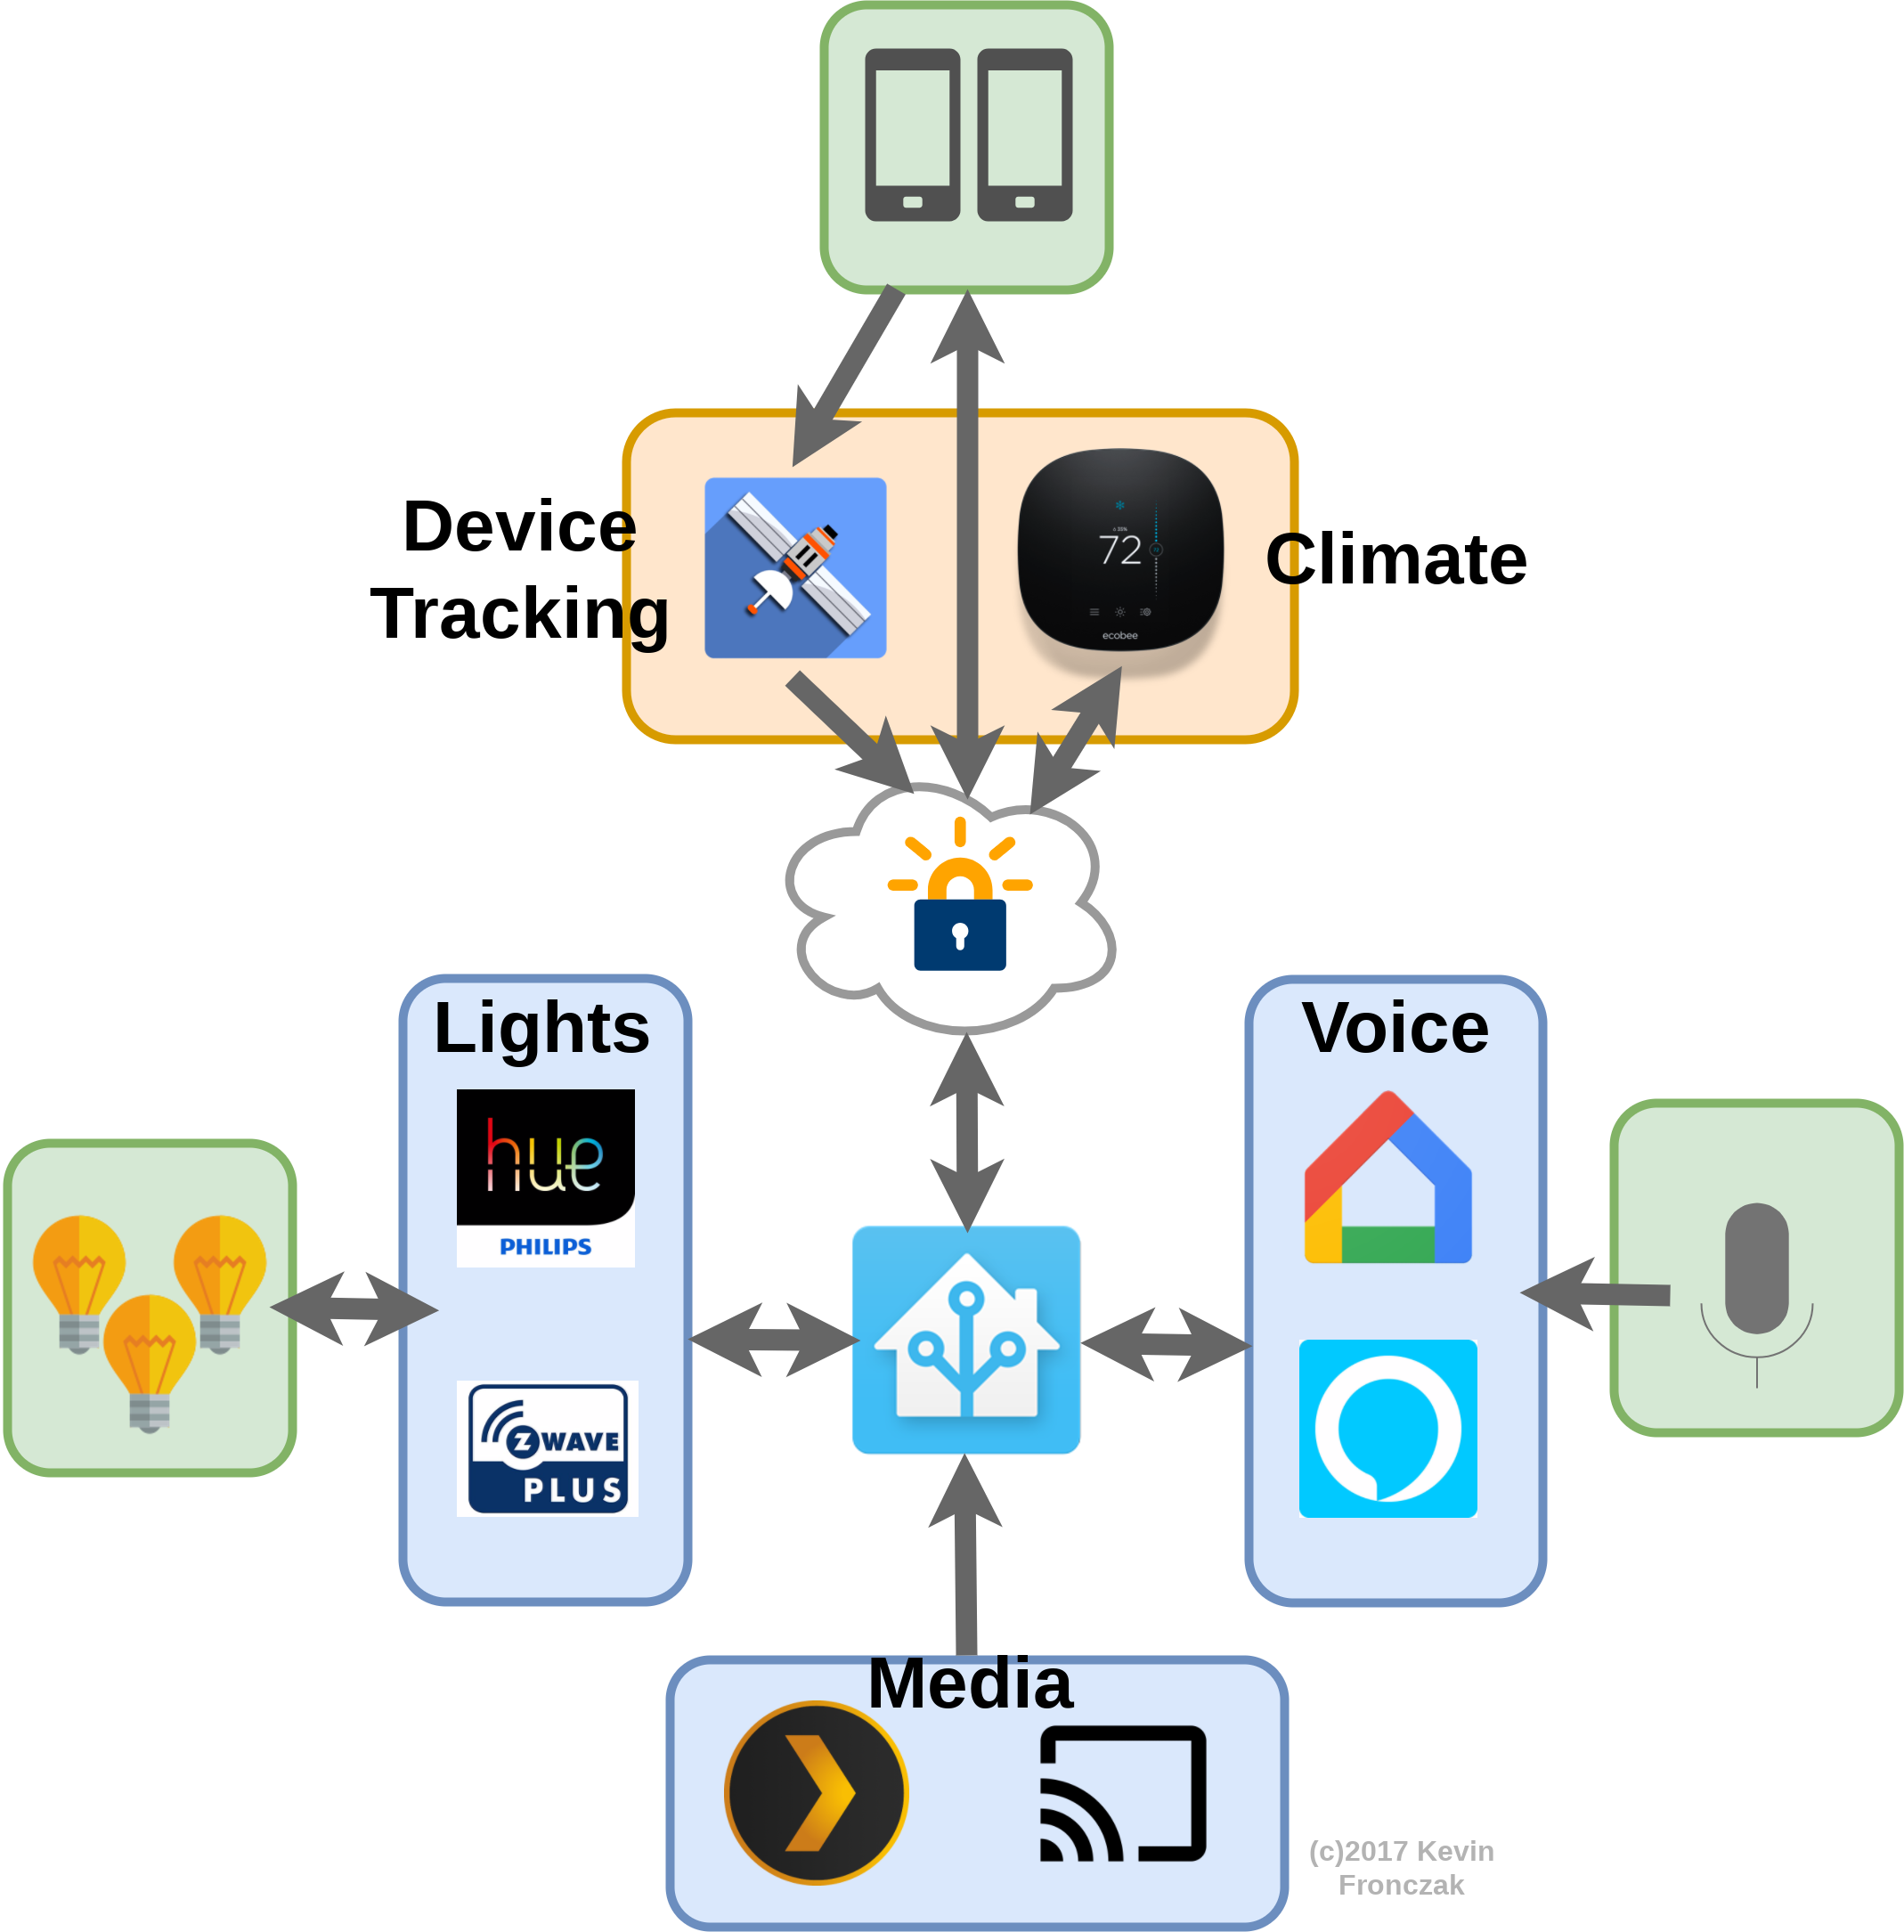
I’ll step through each major section and describe the important bits.
Lights with Phillips Hue
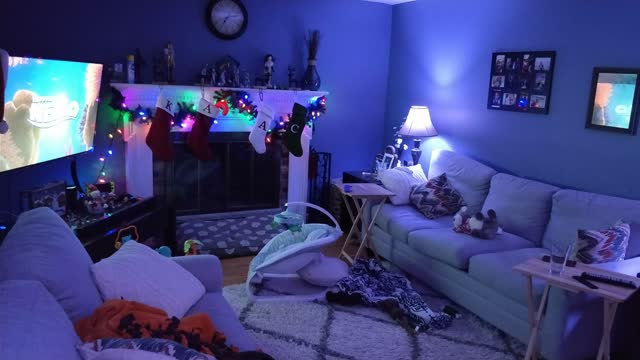
Now, here my cost increased. I purchased a Phillips Hue hub and three 2nd-generation color bulbs which ran me around $140 thanks to a sale. However, I viewed this as a win since the Hue hub did not require a server connection to work which would help me eliminate the Wink hub from my setup and achieve my goal of local-only control. Plus, with the color lights, I could do cool stuff during the holidays like this:

There was another cool thing I could do with the Phillips Hue lights: color temperature modulation similar to the computer program f.lux. During the day I can set the Hue bulbs to a whitish-blue color to simulate daylight and then, during night, I can make the color more warm to help maintain my family’s Circadian Rhythm. Originally, I used the built-in flux component for Home Assistant, but ran into a few problems. Some of these issues may not exist anymore, but they did at the time and I needed to fix it:
- Simple linear interpolation from sunrise to sunset is a poor approximation
- Lights turned on after midnight were daytime color (yikes)
- Updated way too frequently and caused some race conditions (turning light off during an update would prevent me from turning them off)
Ultimately, I could refactor the flux component myself, or implement something on my own. I chose the latter by using AppDaemon. The logic is pretty simple, and my implementation can be found here. I have a time-lapse showing it working below. Every hue light in my house utilizes this component, and I have flux “zones” so I can do different things with different lights without affecting certain rooms (I’ll get to that in a bit).

Media
In addition to flux lights, I also wanted to change lights depending on media. My initial implementation was simple: using the Emulated Hue component, I could simply say:
Alexa/Hey Google, turn on Movie Mode
which would then activate my scene called “Movie Mode”, defined below.
name: Movie Mode
entities:
  input_boolean.flux_living_room:
    state: off
  light.couch_left:
    state: on
    color_temp: 500
    brightness: 50
  light.couch_right:
    state: on
    color_temp: 500
    brightness: 50
  light.corner:
    state: on
    color_temp: 500
    brightness: 50
This simply turns off the flux component and then dims the lights (see the example below). Now, I mentioned that I had different flux groups and here’s why: if I’m watching a movie in my basement (like in the gif below) I don’t want to stop updating the color temperature elsewhere in the house. So here, I am able to turn off flux for only the lights I’m dimming which means the rest of my house is unaffected. This has been very useful.

Automating Movie Mode
Now, I already had Plex in Home Assistant so I could monitor various things that were playing. This allowed me to add an automation to check if a movie is playing via Plex on my NVidia Shield TV and then automatically activate my “Movie Mode” scene. The first step I took (although, technically it is unnecessary) was to create a template sensor called media that I could use within my automation:
- platform: template
  sensors:
    media_type:
      value_template: >
        {% if states.media_player.shield_android_tv.attributes %}
          {{ states.media_player.shield_android_tv.attributes.media_library_name }}
        {% else %}
          None
        {% endif %}
    media_title:
      value_template: >
        {% if states.media_player.shield_android_tv.attributes %}
          {{ states.media_player.shield_android_tv.attributes.media_title }}
        {% else %}
          None
        {% endif %}
    media_state:
      value_template: >
        {% if states.media_player.shield_android_tv.state %}
          {{ states.media_player.shield_android_tv.state }}
        {% else %}
          None
        {% endif %}
Now, this provided me with the following information:
sensor.media_typetells me which library I’m playing my Media from (TV Shows, Movies, etc)sensor.media_statetells me if the media isplayingorpausedsensor.media_titletells me the title of the media… this will be handy in a bit
Next, I needed an automation to trigger some script (using Home Assistant’s python scripts). Essentially, I wanted to call this script whenever the media changes from playing to paused and vice versa. I also wanted to make sure it only changed when we were home (in case we have a babysitter… don’t want to freak them out with color changing lights). I settled on the following automation:
alias: Movie Colors
trigger:
  - platform: state
    entity_id: sensor.media_state
condition:
  condition: and
  conditions:
    - condition: state
      entity_id: sensor.occupancy
      state: 'home'
action:
  - service: python_script.media_engine
So now it was time to create the script that acts on this information. As mentioned, I decided to use Home Assistant’s python scripts which allows me to use much cleaner syntax than yaml would provide. The gist is that when a movie is playing, I want to turn on my Movie Mode, but when the media is paused, I should re-enable flux.
Easy enough.
But what I also realized would be cool was to check exactly what movie was playing and change the color based on that. There are many implementations out there that change colors while the movie is playing, but I just wanted a nice static color (specifically for kids movies for my daughter’s sake). So I created a bunch of scenes for different colors. Inside my python script, I have a simple dictionary of movie titles and colors I want to display when the movie is playing. For example, below is what happens when I play Finding Nemo.
And, the brains of the script:
# Set color in living room based on what's playing on Plex

movie_color_mapping = {
    'Beauty and the Beast (1992)': 'yellow',
    'A Christmas Story (1983)': 'christmas',
    'Finding Nemo (2003)': 'blue',
    'Frozen (2013)': 'cyan',
    'Halloweentown (1998)': 'orange',
    'The Lion King (1994)': 'orange',
    'The Martian (2015)': 'orange',
    'Monsters, Inc. (2001)': 'purple',
    'Tangled (2010)': 'green',
    'Up (2009)': 'pink',
    'Moana (2016)': 'cyan',
    'WALL-E (2008)': 'orange'
}

media_title = hass.states.get('sensor.media_title').state
media_type = hass.states.get('sensor.media_type').state
media_status = hass.states.get('sensor.media_state').state

if media_type == 'Movies' and media_status == 'playing':
    hass.services.call('input_boolean', 'turn_off', {'entity_id': 'input_boolean.flux_living_room'})
    if media_title in movie_color_mapping.keys():
        color = movie_color_mapping[media_title]
        logger.warn('Using color {}'.format(color))
        hass.services.call('scene', 'turn_on', {'entity_id': 'scene.{}'.format(color)})
    else:
        hass.services.call('scene', 'turn_on', {'entity_id': 'scene.movie_mode'})
elif media_type == 'Movies' and media_status == 'paused':
    hass.services.call('input_boolean', 'turn_on', {'entity_id': 'input_boolean.flux_living_room'})
    hass.services.call('scene', 'turn_on', {'entity_id': 'scene.night'})
elif media_status == 'idle':
    hass.services.call('input_boolean', 'turn_on', {'entity_id': 'input_boolean.flux_living_room'})
Kid movies definitely feel the most appropriate for color changing, whereas the grown-up films are more suited for the light-dimming. Though having our living room bathed in a reddish-orange glow when The Martian is playing is pretty awesome.
Climate Control
The next big piece for me to solve was how to control my home’s temperature. Similar to my lights setup, I wanted to be able to modify the thermostat based not only on time of day, but on whether my wife and I were home. I ended up purchasing an Ecobee smart thermostat which, retrospectively, was a complete waste. At the time, I was still only dabbling in Home Assistant and had yet to fully realize it’s utility: making dumb components smart. Adding a smart thermostat was a mistake because my end goal with Home Assistant renderred it dumb. My final implementation ends up working just as well will a cheap Z-Wave thermostat as it does with the expensive Ecobee. Plus, another knock against the Ecobee is that it is not local-only control. Ecobee’s servers go down, so does my thermostat.
But at a $250 price tag, I’ll live with it (for now).
My implementation is pretty straight-forward (I think). I first check the time and presence to see which state we’re in:
homeawaysleep
Based on those three states, I have pre-set temperatures I want the house to be at depending on the outside temperature (which I pull from the Wunderground component). For example, during the day when either my wife or myself are home, I want to set the house to 75 degrees in the summer and 68 degrees in the winter.
Now, to add a wrinkle to that, in the summer my house can get pretty humid if the temperature in in the mid-to-upper 70s and the AC hasn’t kicked on for awhile. To solve that, I change my temperature set point based on indoor humiditiy as well which seemed to help quite a bit this past year.
One last feature I added was a simple button to allow someone with access to my Home Assistant front-end to turn the thermostat on before someone is home. Once my occupancy sensor flips from not_home to home, the input_boolean is turned off. This is mostly useful in the winter when my wife and I are at work so we can warm the house up before we actually get home.
My primary automation (which I don’t show here) is just a bunch of triggers which then call the following python script:
-----------------------------------------------------------------------------
# Changes thermostat based on external and internal temps
#-----------------------------------------------------------------------------

# Thermostat thresholds
THRESHOLD_FOR_HEAT = 55
THRESHOLD_FOR_AC   = 77
AC   = {'home': 75, 'away': 82, 'sleep': 78}
HEAT = {'home': 68, 'away': 58, 'sleep': 64}

SLEEP_TIME = [5, 21]

# Get current temperatures
outside_temp = float(hass.states.get('sensor.pws_feelslike_f').state)
living_room_temp = float(hass.states.get('sensor.living_room_temperature').state)
bedroom_temp = float(hass.states.get('sensor.bedroom_temperature').state)
living_room_humidity = float(hass.states.get('sensor.living_room_humidity').state)

# Get various system stats
thermostat_enable = (hass.states.get('input_boolean.thermostat_enable').state == 'on')
someone_home = (hass.states.get('sensor.occupancy').state == 'home' or hass.states.get('input_boolean.guest_mode').state == 'on')
on_the_way_home = (hass.states.get('input_boolean').state == 'on')
current_time = datetime.datetime.now()
current_hour = current_time.hour

# Determine home, away, or sleep
if someone_home or on_the_way_home:
    state_key = 'home'
    if current_hour < SLEEP_TIME[0] and current_hour > SLEEP_TIME[1]:
        state_key = 'sleep'
else:
    state_key = 'away'

# Only fire if thermostat is enabled
if thermostat_enable:
    # Set thermostat to auto before changing temperatures
    hass.services.call('climate', 'set_operation_mode', {'entity_id': 'climate.living_room', 'operation_mode': 'auto'})
    target_high = 82
    target_low  = 58
    mode = 'off'
    if outside_temp > THRESHOLD_FOR_AC:
        mode = 'auto'
        if living_room_humidity > 55:
            target_high = AC[state_key] - 1
        else:
            target_high = AC[state_key]
    elif outside_temp < THRESHOLD_FOR_HEAT:
        mode = 'auto'
        target_low = HEAT[state_key]
    elif state_key != 'sleep' and outside_temp > 74:
        if (current_temp - outside_temp) >= 1 or living_room_humidity > 59:
            mode = 'auto'
    # Now make service call
    data_mode = {'entity_id': 'climate.living_room', 'operation_mode': mode}
    data_temps = {'entity_id': 'climate.living_room', 'target_temp_high': target_high, 'target_temp_low': target_low}
    hass.services.call('climate', 'set_operation_mode', data_mode)
    if mode != 'off':
        hass.services.call('climate', 'set_temperature', data_temps)

    hass.services.call('input_boolean', 'turn_off', {'entity_id': 'input_boolean.on_the_way_home'})
Device Tracking
For a very long time I had used the nmap component with great success (using a Nexus 6P and Nexus 5X). Once my wife and I switched phones to the One Plus 5, however, nmap became… spotty at best. I had tried adding in the ping component for added redundancy, but our phones just liked to hop off the wifi too much (which I think is an actual phone bug, but I digress). To alleviate this issue I switched to a GPS-based solution using GPS Logger which has been phenomenal. Perfectly reliable, and I even added google maps to the Home Assistant front end to show where we are (after seeking approval from my wife, since it felt kind of… stalky). The maps have actually been very useful to get ETAs from work or what have you.
Other Components
Now that the primary components are pretty well described, here’s a few others that I’ve added that have been pretty neat.
Z-Wave
I’ve added a few z-wave components such as light switches and smoke detectors (which have been great at alerting me when I’ve burned something while cooking…) but by far my favorite addition has been the Aeotec Smart Switch. I’ve been using this connected to my washing machine to let me know when a cycle is complete. Getting there was a bit of a challenge (and actually required me to find the Engineering Manual to figure out which bits I needed to set). By default, the switch is configured to send a report for the current wattage in use if the change in wattage from the last report was more than 25W.
This was inadequate. However, reducing this threshold was also inadequate as the switch is also configured to send updates as fast as three seconds apart. So I had at least two fields to override, and also wanted to find a way to report back both the voltage and current measured by the switch.
One step at a time. As a note, I originally performed all of these changes within the OpenZWave Control Panel, but as long as you have a way to set values for individual fields, you should be fine.
Changing Mininum Wattage to send Report
This field is number 91 (0x5B) and I set this to 10 W.
Changing Minimum Report Time
This is field number 111 (0x6F) and I set the value to 120 (2 minutes).
Changing Default Report
As I mentioned, the default report sends back only wattage, but I want to access voltage and current as well. This simply required writing a value of 7 to field 101 (0x65). Here, the LSB (bit 0) sets a flag for the voltage to be reported, bit 1 sets the current, bit 2 sets the wattage, and bit 3 sets the energy in kWh. I opted not to set bit 3, but if you wanted everything you could just write field 101 to a 15 (0xF) instead of 7.
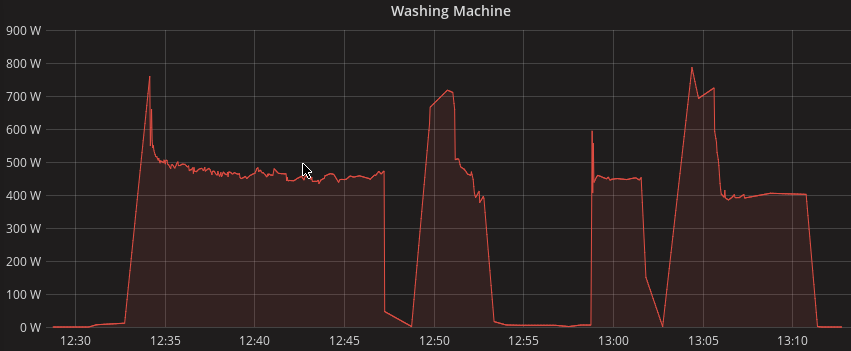
Creating my Washing Machine Sensor
Now that I have the data, I needed to appropriately determine if the washer was running or not. This was pretty easy to determine once I collected some data. Below is a plot of the reported wattage consumed by my washing machine during a normal cycle (plotted with Grafana). Despite those deep valleys, the power never quite reaches 0W, so I set my minimum threshold to 0.1W and placed an upper bound at 8191W (since I ran into an issue, at least once, where there was some sort of overflow causing my sensor to report back that my washer was consuming hundreds of mega-watts of power… it wasn’t).
And here is the associated template sensor:
- platform: template
  sensors:
    washer:
      value_template: >
        {% if states.sensor.power_mon_power %}
          {% if (states.sensor.power_mon_power.state | float) > 0.1 and (states.sensor.power_mon_power.state | float) < 8191.0 %}
            Running
          {% else %}
            Not Running
          {% endif %}
        {% else %}
        {% endif %}
Text-to-Speech
Using the TTS component, I added a few features to help my wife and I out. By far the best one has been with my washing machine (which I described in the Z-Wave section above). Whenever the wash cycle finishes, Home Assistant will send one of three responses (randomly chosen) to my Google Home to let us know. The implementation was heavily inspired by @ccostan and works wonderfully. Here’s a snippet of the script I use:
# speech_engine.yaml

speech_engine:
  sequence:
    - condition: or
      conditions:
        - condition: state
          entity_id: sensor.occupancy
          state: 'home'
        - condition: state
          entity_id: input_boolean.guest_mode
          state: 'on'

  # Speak to all google home devices
    - service: script.speech_processing
      data_template:
        speech_message: >
          {%- macro dark_outside() -%}
            {{ [
            "It's getting late, I will turn on the outside lights.",
            "The sun has set, time to turn the lights on outside.  I'm on it.",
            "I'll go ahead and turn the outside lights on, it's getting dark.",
            "Looks like it's time to turn the lights on outside.  I got it."
            ] | random }}
          {%- endmacro -%}

          {%- macro washer_status() -%}
            {% if states.sensor.washer.state == 'Not Running' %}
              {{ [
              "Washer cycle is complete, time to throw the clothes into the dryer.",
              "Looks like the wash just finished.  Figured I should let you know.",
              "Just popping in to let you know the wash is done.",
              ] | random }}
            {% endif %}
          {%- endmacro -%}

          {% if call_dark_outside == 1 %}
            {{ dark_outside() }}
          {% endif %}
          {% if call_washer_status == 1 %}
            {{ washer_status() }}
          {% endif %}
# speech_processing.yaml
speech_processing:
  sequence:
    - service: media_player.volume_set
      entity_id: media_player.google_home
      data:
        volume_level: 0.5
    - service: tts.google_say
      entity_id: media_player.google_home
      data_template:
        message: >
          {{ speech_message }}
Fail2Ban Sensor
After I wrote my fail2ban post I decided an actual component would be worthwhile in Home Assistant, so I wrote one.
Fairly recently, I migrated my Home Assistant instance to my UnRAID server and wanted to make sure no one was trying to get into my server. So I needed to set up three jails:
- nginx
- Organizr
- hass
The only two I needed to manually add were for Home Assistant and Organizr, since my Let’s Encrypt/Nginx instance already had jails defined for unauthorized Nginx access. Here are the pertinent jails:
[hass-iptables]
enabled = true
filter = hass
action = iptables-allports[name=HASS]
logpath = /hass/home-assistnat.log
maxretry = 5
logencoding = utf-8

[organizr-auth]
enabled = true
port = http,https
filter = organizr-auth
logpath = /organizr/loginLog.json
The other part, prior to setting the component up in Home Assistant, was to add my filters. In my filter.d folder inside fail2ban I added the following filter called hass.local:
[INCLUDES]
before = common.conf

[Definition]
failregex = ^%(__prefix_line)s.*Login attempt or request with invalid authentication from <HOST>*$

ignoreregex =

[Init]
datepattern = ^%%Y-%%m-%%d %%H:%%M:%%S
And then another for organizr called organizr-auth.local:
[Definition]
failregex = ","username":"\S+","ip":"<HOST>","auth_type":"bad_auth"}

ignoreregex =
Basically, all those filters are doing are setting up a way to parse the log files for the ip addresses causing authorization failures. Once those are parsed out, fail2ban will… well… ban them. So to view the banned ips in Home Assistant, I add the following sensor:
# Note, filepath --> /fail2ban/fail2ban.log
# Using secret so that travis builds don't fail
- platform: fail2ban
  file_path: !secret fail2ban_log
  scan_interval: 120
  jails:
    - hass-iptables
    - nginx-http-auth
    - organizr-auth
On top of this, I also have an automation to notify me when a ban has been served (among other things):
notify_kevin_engine:
  sequence:
    - service: notify.notify_kevin_phone
      data_template:
        message: >
          {%- macro on_restart() -%}
            Home Assistant restarted {{ now().strftime("%h %d, %Y at %H:%M:%S") }}
          {%- endmacro -%}
          {%- macro failed_login() -%}
            Failed Login! {{ now().strftime("%h %d, %Y at %H:%M:%S") }}
            {% if states.sensor.fail2ban_hassiptables.state != "None" %}
            HASS Attempt(s) from {{states.sensor.fail2ban_hassiptables.state}} {% endif %} {% if states.sensor.fail2ban_nginxhttpauth.state != "None" %}
            NGINX Attempt(s) from {{states.sensor.fail2ban_nginxhttpauth.state}}{% endif %}{% if states.sensor.fail2ban_nginxhttpauth.state != "None" %}
            Organizr Attempt(s) from {{states.sensor.fail2ban_organizrauth.state}}
            {% endif %}
          {%- endmacro -%}
          {##################}
          {# BEGIN ROUTINES #}
          {##################}
          {% if call_on_restart == 1 %}
            {{ on_restart() }}
          {% endif %}
          {% if call_failed_login == 1 %}
            {{ failed_login() }}
          {% endif %}
And here’s what the automation looks like to trigger the above script call:
alias: Notify on Failed Login
trigger:
  - platform: state
    entity_id: sensor.fail2ban_nginxhttpauth
  - platform: state
    entity_id: sensor.fail2ban_hassiptables
  - platform: state
    entity_id: sensor.fail2ban_organizrauth
condition:
  condition: or
  conditions:
    - condition: template
      value_template: '{{ states.sensor.fail2ban_hassiptables.state != "None" }}'
    - condition: template
      value_template: '{{ states.sensor.fail2ban_organizrauth.state != "None" }}'
    - condition: template
      value_template: '{{ states.sensor.fail2ban_nginxhttpauth.state != "None" }}'
action:
  - service: script.notify_kevin_engine
    data:
      call_failed_login: 1
Final Words
This turned into a much longer post than I had anticipated, but hopefully it is useful to someone. My configuration has ballooned considerably since I started using Home Assistant, but it has been completely worth it. I truly believe it is the best home automation platform out there and the progress the core devs are making toward polishing the user-friendliness aspect is very promising (even if I am specifically avoiding using those features). Home Assistant is a very powerful platform and is very easy to use once you get a grasp on yaml and, ideally, python.
- Share this post!


